Configure DKIM with Postfix on Ubuntu
Implementing DKIM is vital for email security, but it's just one part of the puzzle. SPF, DMARC, and rDNS are equally important. SPF defines authorized sending servers, DMARC dictates handling of SPF/DKIM failures, and rDNS connects IPs to domains, collectively boosting security and deliverability.

Now, with DKIM and SPF a major requirement for sending emails to Gmail and Yahoo! It's now important for self-hosters, webmasters & email service providers to implement DKIM signature on the emails sent from their networks.
Before we start, let's understand what Postfix and DKIM are. When you send an email, it is transferred to an Mail Transfer Agent (MTA) which is responsible for transferring this email to the receiving server (for instance, from Outlook to Gmail). This software is also responsible for handling other sorts of complexities involved in email delivery such as delivery failures, bounces, queue and so on. There's a variety of such software available on the Internet and one of them is Postfix. Some modern and other friendlier MTAs include Zone MTA, Haraka and Power MTA.
But, what's DKIM and SPF? Back to 1980s, the SMTP protocol was released, but without authentication. So um, anyone could send an email on behalf of anyone? Crazy, right?
DomainKeys, also known as, DKIM were introduced in 2004 to prevent email forgery. A simple and straightforward concept. A public key is published in the DNS record and the corresponding private key is used to sign the outgoing email headers and the signature is then attached to the email itself. On receiving the email, the receiving MTA extracts this signature and validates it to ensure that the email was correctly signed.
A similar concept, Sender Policy Framework (SPF), was introduced in 2014. Just like with DKIM, a DNS record is published which includes the list of IP addresses and hosts that are authorized to send emails on behalf of that particular domain. This means that even if your DKIM private key is leaked, your emails are still authenticated because the attacker cannot send traffic through your IP addresses.
Sad part? By default, Postfix, doesn't include any DKIM signing. Good part? We're here to teach you how to setup DKIM (OpenDKIM) signing with Postfix!
Install Postfix and OpenDKIM
First things first, let's begin by installing Postfix. In this article, we're going to assume that you're using the hostname: mail.example.com
debconf-set-selections <<< "postfix postfix/mailname string mail.example.com"
debconf-set-selections <<< "postfix postfix/main_mailer_type string 'Internet Site'"
apt-get install --assume-yes postfix;
Once that's done, let's install OpenDKIM and add postfix user to the opendkim user group. This is a common step in configuring Postfix and OpenDKIM to work together.
apt-get install opendkim opendkim-tools -y;
gpasswd -a postfix opendkim;
At this point, all the fundamental software that we need is installed. We will now configure OpenDKIM.
Configuring OpenDKIM with Postfix
We'll now configure OpenDKIM with Postfix with a milter.
echo "AutoRestart             Yes
AutoRestartRate         10/1h
UMask                   002
Syslog                  yes
SyslogSuccess           Yes
LogWhy                  Yes

Canonicalization        relaxed/simple

ExternalIgnoreList      refile:/etc/opendkim/TrustedHosts
InternalHosts           refile:/etc/opendkim/TrustedHosts
KeyTable                refile:/etc/opendkim/KeyTable
SigningTable            refile:/etc/opendkim/SigningTable

Mode                    sv
PidFile                 /var/run/opendkim/opendkim.pid
SignatureAlgorithm      rsa-sha256

UserID                  opendkim:opendkim

Socket                  inet:12301@localhost" >> /etc/opendkim.conf;
echo 'SOCKET="inet:12301@localhost"' >> /etc/default/opendkim;
echo 'milter_protocol = 2
milter_default_action = accept' >> /etc/postfix/main.cf;
echo 'smtpd_milters = inet:localhost:12301
non_smtpd_milters = inet:localhost:12301' >> /etc/postfix/main.cf;
mkdir /etc/opendkim;
mkdir /etc/opendkim/keys;
echo '127.0.0.1
localhost
192.168.0.1/24

*.mail.example.com' >> /etc/opendkim/TrustedHosts;
Change the hostname in the above command and execute it in your terminal. These are a bunch of commands merged together. We're setting up the OpenDKIM configuration, setting up the key table and setting up the milter (think of a plugin) to be used with Postfix.
OpenDKIM and Postfix are configured now. The next step is to create an public and private key pair to be used for signing and verifying emails.
cd /etc/opendkim/keys;
mkdir mail.example.com;
cd mail.example.com;
opendkim-genkey -s mail -d mail.example.com;
chown opendkim:opendkim mail.private;
If you want to change the DKIM selector, you can change -s mail to something else, such as -s mta. This is particularly useful if you've multiple mail servers sending emails through the same hostname.
Add this private key in the key and signing table so that OpenDKIM recognizes any emails sent from this domain and signs them.
echo 'mail._domainkey.mail.example.com mail.example.com:mail:/etc/opendkim/keys/mail.example.com/mail.private' >> /etc/opendkim/KeyTable;

echo '*@mail.example.com mail._domainkey.mail.example.com' >> /etc/opendkim/SigningTable;
Restart with Postfix and OpenDKIM now.
service postfix restart;
service opendkim restart;
We're now going to publish this DKIM public key in our DNS record. So head over to your DNS host, such as Cloudflare, Namecheap, or it could be your domain registrar.
Create a TXT DNS record for the hostname, mail._domainkey.mail.example.com, and populate it with the contents in the mail.txt file. You can use the following command to print the contents on the screen.
cat /etc/opendkim/keys/mail.example.com/mail.txt
By this time, Postfix and OpenDKIM should up and running. Wait for a couple of minutes since DNS propagation can take a while.
Testing DKIM Configuration
To test your OpenDKIM configuration, you can send a test email using Sendmail to an email testing service like Mail Tester. Mail Tester is a helpful tool for evaluating your email's spam score and identifying any potential issues that could affect its deliverability.
Install MailUtils.
apt install mailutils
Finally, get a testing email from Mail Tester and send an email to it.
echo "This is a test message." | sendmail -f "hello@mail.example.com" [email protected]
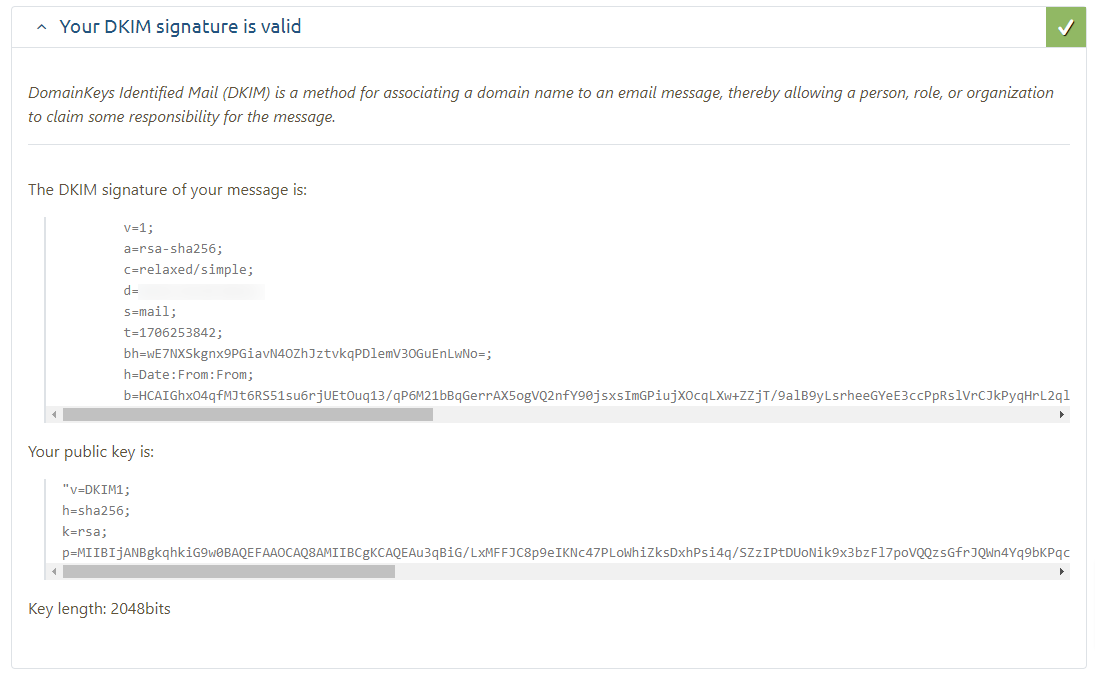
As you can see in the screenshot, the email headers are signed and verified by Mail Tester.
Conclusion
In a nutshell, implementing DKIM (DomainKeys Identified Mail) with Postfix is an essential step for email service providers, self-hosters, and webmasters to guarantee email authenticity and improve deliverability. The steps include installing Postfix and OpenDKIM, configuring OpenDKIM with Postfix, generating a public and private key pair, and adding the public key to your DNS entries.
In addition to DKIM, it is vital to install SPF (Sender Policy Framework), DMARC (Domain-based Message Authentication, Reporting, and Conformance), and rDNS (Reverse DNS). SPF helps to specify which mail servers are authorised to send emails on behalf of your domain, DMARC instructs the receiving mail server on how to handle emails that fail SPF and DKIM checks, and rDNS ensures that the sending server's IP address can be resolved back to the sending domain.
Areeb Majeed is the co-founder of Maileroo. With a background in technology, Areeb plays a key role in shaping the company's technical strategy and overseeing its implementation.