Get Connected: Configuring Custom Email Accounts with Email App Using POP3 & IMAP
Are you tired of using multiple email apps to access all of your different email accounts? Look no further! With SMTP, POP3, and IMAP, you can easily configure your custom email accounts with your email app. This will allow you to have all of your emails in one convenient location, making it easier for you to stay connected and organized. In this blog post, we will guide you through the process of setting up your custom email account using POP3 and IMAP protocols, so you can start enjoying the convenience and efficiency of having all of your emails in one place.
Choosing an email app
Choosing an email app can be a daunting task, with so many options available in the market. But fear not! We’re here to help you make an informed decision. When it comes to setting up a custom email account, the right app can make all the difference in terms of convenience, features, and user experience.
So, how do you choose the best email app for your needs? Here are a few factors to consider:
1. User-friendly interface: Look for an email app that has an intuitive and easy-to-use interface. You don’t want to waste time trying to figure out how to navigate through complex menus or settings. A clean and organized interface will make your email management a breeze.
2. Compatibility with multiple protocols: Ensure that the email app supports both POP3 and IMAP protocols. This will allow you to configure your custom email account seamlessly. You want an app that can handle all your email accounts, regardless of the service provider.
3. Advanced search and organization features: Look for an app that offers powerful search capabilities and advanced organization features. These can include features like filters, labels, and customizable folders, which will help you keep your inbox organized and find important emails quickly.
4. Security: It’s important to prioritize the security of your emails. Make sure the email app you choose has strong encryption and privacy features. Look for features like two-factor authentication and spam filtering to protect your account from unauthorized access and malicious emails.
5. Integration with other apps: Consider whether the email app integrates well with other productivity apps you use, such as calendars or note-taking apps. This can streamline your workflow and make it easier to manage your tasks and appointments.
6. Customer support: Lastly, choose an email app that offers good customer support. You want to have a reliable and responsive support team that can assist you if you run into any issues or have questions about the app.
Taking these factors into consideration will help you find the perfect email app for your custom email setup. Remember, the right app can greatly enhance your email management experience, making it easier to stay connected and organized.
Setting up a custom email account using IMAP
Setting up a custom email account using IMAP is a straightforward process that will allow you to seamlessly integrate all of your email accounts into one convenient location. By following these simple steps, you’ll be able to access and manage all of your emails with ease.
First, you’ll need to choose an email app that supports the IMAP protocol. There are several popular options available, such as Gmail, Outlook, and Thunderbird. Once you have selected your preferred app, you can begin the setup process.
1. Open the email app on your device and navigate to the settings menu. Look for the option to add a new email account.
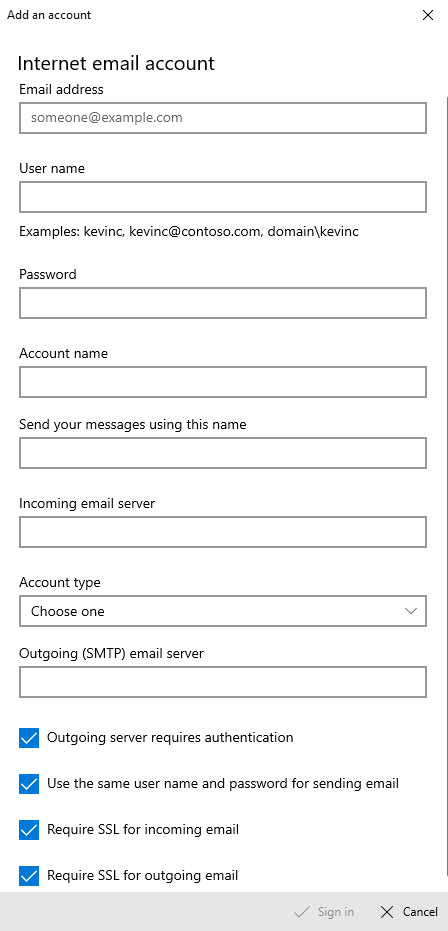
2. Select the IMAP protocol as the type of account you wish to add. Enter the required information, including your email address and password. Make sure to double-check that all the information is accurate before proceeding.
3. Next, you’ll need to configure the incoming and outgoing server settings. The app will typically provide default settings, but you may need to enter specific server information depending on your email provider. You can usually find this information on your email provider’s website or by contacting their customer support.
4. Once you have entered the server settings, the app will verify the information and establish a connection with your email account. This process may take a few moments.
5. After the connection is established, you will have the option to customize additional settings, such as syncing frequency, notifications, and signature. These settings can be adjusted according to your personal preferences.
6. Once you have completed the setup process, the email app will begin syncing your inbox, and you will be able to access all of your emails in one place.
Congratulations! You have successfully set up a custom email account using the IMAP protocol. Now you can enjoy the convenience and efficiency of having all of your emails in one location. Remember to repeat these steps for any additional email accounts you wish to add.
With a properly configured email app using IMAP, you’ll no longer have to juggle multiple email apps or accounts. Instead, you can streamline your email management and stay connected with ease. So go ahead, follow these steps, and start enjoying the benefits of a custom email setup today!
Setting up a custom email account using POP3
Setting up a custom email account using POP3 is a simple and efficient way to integrate all of your email accounts into one convenient location. By following these easy steps, you’ll be able to access and manage all of your emails with ease.
To begin, you’ll need to choose an email app that supports POP3 protocol. There are many popular options available, such as Gmail, Outlook, and Thunderbird. Once you’ve selected your preferred app, you can start the setup process.
Open the email app on your device and navigate to the settings menu. Look for the option to add a new email account. Select the POP3 protocol as the type of account you wish to add. Enter the required information, including your email address and password. Make sure to double-check that all the information is accurate before proceeding.
Next, you’ll need to configure the incoming and outgoing server settings. The app will usually provide default settings, but you may need to enter specific server information depending on your email provider. You can usually find this information on your email provider’s website or by contacting their customer support.
Once you’ve entered the server settings, the app will verify the information and establish a connection with your email account. This process may take a few moments. After the connection is established, you’ll have the option to customize additional settings, such as syncing frequency, notifications, and signature. These settings can be adjusted according to your personal preferences.
Congratulations! You’ve successfully set up a custom email account using the POP3 protocol. Now you can enjoy the convenience and efficiency of having all of your emails in one location. Repeat these steps for any additional email accounts you wish to add.
With a properly configured email app using POP3, you’ll no longer have to switch between multiple email apps or accounts. Instead, you can streamline your email management and stay connected with ease. So go ahead, follow these steps, and start enjoying the benefits of a custom email setup today!
Troubleshooting common issues
Setting up a custom email account using POP3 and IMAP protocols is usually a seamless process. However, there are a few common issues that you may encounter along the way. Don’t worry, we’re here to help! In this section, we’ll guide you through troubleshooting some of the most common issues that you may face during the setup process.
1. Incorrect server settings: One of the most common issues is entering incorrect server settings. Double-check that you have entered the correct incoming and outgoing server addresses and ports. Make sure to consult your email provider’s website or customer support for the accurate server information.
2. Authentication errors: If you receive authentication errors while setting up your custom email account, verify that you have entered the correct username and password. Remember that these credentials are case-sensitive, so check for any typos or incorrect capitalization.
3. Connection issues: If you’re having trouble establishing a connection with your email account, ensure that you have a stable internet connection. Check your Wi-Fi or data connection and try again. If the problem persists, try restarting your device or contacting your internet service provider.
4. Security and encryption: If you’re concerned about the security of your emails, make sure that your email app has enabled SSL/TLS encryption. This ensures that your emails are transmitted securely over the internet and protected from unauthorized access.
5. Syncing and notifications: If you’re experiencing issues with syncing your emails or receiving notifications, check the app’s settings. Make sure that you have enabled syncing for your custom email account and that notifications are turned on.
If you encounter any other issues during the setup process, don’t hesitate to reach out to the email app’s customer support for assistance. They will be able to guide you through any specific issues you may be facing.
By following these troubleshooting steps, you should be able to resolve most common issues encountered during the setup of a custom email account using POP3 and IMAP protocols. Remember, patience and attention to detail are key when setting up email accounts, and with the right troubleshooting steps, you’ll be able to enjoy the convenience and efficiency of a custom email setup in no time!